Tag Archives: Salesforce.com

How to disable right click on visualforce page?

Sometimes we need to disable right click on visualforce page. Here in this article i will demonstrate how to disable right click on visualforce page using javascript.

Let’s take a simple example:
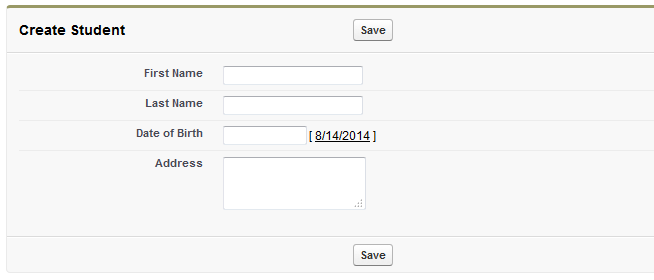
The below visualforce page is a simple entry page of “Student” custom object. Here the javascript method “RightClickDisabled”, disabled right click in form onmousedown event.

<apex:page standardcontroller="Student__c">
  <script>
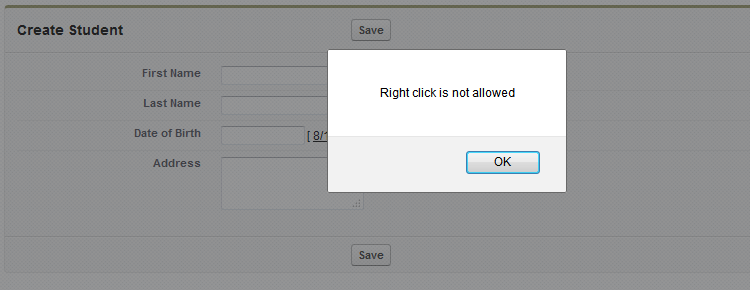
      function RightClickDisabled(event){    
        if (event.button==2)
        {
            alert("Right click is not allowed");       
        }
      }
  </script>
  <apex:form onmousedown="RightClickDisabled(event)">
      <apex:pageblock title="Create Student">
          <apex:pageblockbuttons>
              <apex:commandbutton action="{!save}" value="Save">
          </apex:commandbutton></apex:pageblockbuttons>
          <apex:pageblocksection columns="1">
              <apex:inputfield value="{!Student__c.First_Name__c}">
              <apex:inputfield value="{!Student__c.Last_Name__c}">
              <apex:inputfield value="{!Student__c.Date_of_Birth__c}">
              <apex:inputfield value="{!Student__c.Address__c}">              
          </apex:inputfield></apex:inputfield></apex:inputfield></apex:inputfield></apex:pageblocksection>
      </apex:pageblock>
  </apex:form>
</apex:page>

download

download (1)

How to restrict double click on visualforce page command button?

It is so important to restrict double click on visualforce page command button. For example – In an visualforce page, there are some input fields and “Save” button. When user will click on “Save” button, record will insert in to the object. If user will double click that “Save” button at same time, then records will be create twice. In this article I will demonstrate, how to achieve this functionality.
Let’s take a simple example:

Visualforce Page:

<apex:page doctype="html-5.0" standardcontroller="Account">
    <apex:form>
        <apex:pagemessages id="messages"></apex:pagemessages>
        <apex:pageblock title="Restrict Doublle Click">
            <apex:pageblockbuttons location="both">
                 
                <apex:actionstatus id="idActionStatus">
                        <apex:facet name="stop">                  
                            <apex:commandbutton action="{!Save}" disabled="false" rerender="idActionStatus" status="idActionStatus" value="Save">
                        </apex:commandbutton></apex:facet>
                        <apex:facet name="start">
                           <apex:commandbutton disabled="true" status="idActionStatus" value="Saving...">
                        </apex:commandbutton></apex:facet>
                    </apex:actionstatus>
                   
            </apex:pageblockbuttons>
            <apex:pageblocksection collapsible="false" title="Create Account">
                <apex:inputfield required="true" value="{!Account.Name}">
                  <apex:inputfield required="true" value="{!Account.AccountNumber}">
            </apex:inputfield></apex:inputfield></apex:pageblocksection>
        </apex:pageblock>
    </apex:form>
</apex:page>

download

download (1)

How to create password field in visualforce page?

To create a password field in visualforce page, you can use inputsecret. InputSecret is an HTML input element of type password.
Let’s take an example:
In below visualforce page there are two input fields Name & Account Number of Account object. Here Account number is in inputsecret. The inputsecret filed of Account Number will act like a password field.

<apex:page doctype="html-5.0" standardcontroller="Account">
    <apex:form>
        <apex:pageblock mode="edit" title="Test Input Secret">
            <apex:pageblockbuttons>
                <apex:commandbutton action="{!save}" value="Save">
            </apex:commandbutton></apex:pageblockbuttons>
            <apex:pageblocksection columns="1" title="Create Account">
                <apex:inputfield required="true" value="{!account.name}">
               <apex:inputsecret required="true" value="{!account.accountNumber}">
            </apex:inputsecret></apex:inputfield></apex:pageblocksection>
        </apex:pageblock>
    </apex:form>
</apex:page>

download

How to use Regex using apex in Salesforce?

Regular expressions (REGEX) is a string that is used to match another string, using a specific syntax. Apex provides patterns and matchers that enable you to search text using regular expressions.

Pattern Class: A pattern is a compiled representation of a regular expression. Patterns are used by matchers to perform match operations on a character string.

Matcher Class: It allows to do further actions such as checking to see if the string matched the pattern or allows to manipulate the original string in various ways and produce a new desired one.

Let’s take one simple example:

public Boolean ValidateEmail(String emailId) 
{
    Boolean result = false;
    String emailRegex = '^[a-zA-Z0-9._|\\\\%#~`=?&/$^*!}{+-]+@[a-zA-Z0-9.-]+\\.[a-zA-Z]{2,4}$';
    Pattern EmailPattern = Pattern.compile(emailRegex);
    Matcher EmailMatcher = EmailPattern.matcher(emailId);
    if(EmailMatcher.matches())
    {
        result = true;
    }
    return result;
}

In above example ValidateEmail is a method with emailId parameter. In ValidateEmail method there is a string variable, which contains email validation regex. Then I create matching pattern by using the pattern class with emailRegex variable. Then I do match it against the emailId. After that I do check emailId variable is in valid email format.

Salesforce: How to craete TreeView in Visualforce Page?

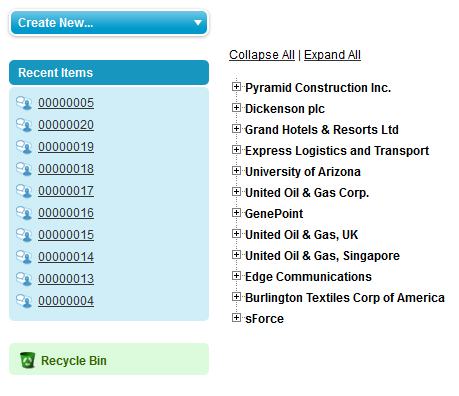
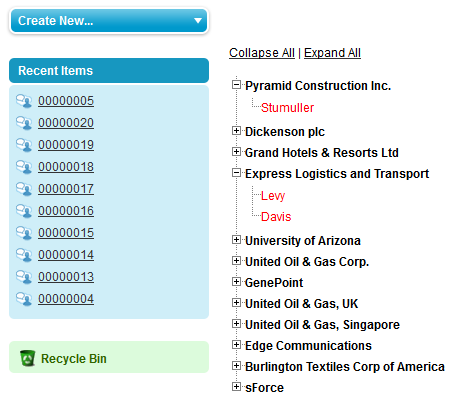
In this article I will demonstrate how to create treeview in visualforce page.
Here in Visualforce Page displays a collapsible treeview, with Accounts and Contacts related to the account.
For this development we need JQuery plugins. Download the Jquery Plugin from here and Upload this Zip file into Static Resources with the name “JqueryTreeView”.

Create Apex class with following code:

public with sharing class TestTreeView
{
    //Wrapper class to contain the parent nodes and their child nodes
    public class WCTreeView
    {    
        public List<contact> Child {get; set;}
        Public Account Parent {get;set;}
         
        public WCTreeView(Account objAC, List<contact> objCList)
        {
            Child = objCList;
            Parent = objAC;
        }
    }
 
    Public List<wctreeview> TreeView;
     
    Public List<wctreeview> GetNodes()
    {
        TreeView = new List<wctreeview>();
        List<account> objACList = [Select Id, Name from Account];
        for (Integer i = 0; i < objACList.size(); i++)
        {
            List<contact> objCList = [Select Id, FirstName, LastName from Contact where AccountId = :objACList[i].Id];
            TreeView.add(new WCTreeView(objACList[i], objCList));
        }   
        return TreeView;
    }   
}

Now create the Visualforce page:

<apex:page controller="TestTreeView">
<!-- Include the Jquery Script files -->
<link href="{!URLFOR($Resource.JqueryTreeView,'Jquerytreeview/jquery.treeview.css')}" rel="stylesheet">
<script src="{!URLFOR($Resource.JqueryTreeView,'Jquerytreeview/jquery.js')}" type="text/javascript"></script>
<script src="{!URLFOR($Resource.JqueryTreeView,'Jquerytreeview/jquery.cookie.js')}" type="text/javascript"></script>
<script src="{!URLFOR($Resource.JqueryTreeView,'Jquerytreeview/jquery.treeview.js')}" type="text/javascript"></script>
<!-- End of Javascript files -->
<script type="text/javascript">
$(function() {
 $("#idTreeView").treeview({
 collapsed: true,
 animated: "medium",
 control:"#IdTreeControl",
 persist: "location"
 });
})
</script>
<!-- Start TreeView -->


<div id="IdTreeControl">
<a href="https://www.blogger.com/blogger.g?#"><span style="color: black;">Collapse All</span></a> | 
<a href="https://www.blogger.com/blogger.g?#"><span style="color: black;">Expand All</span></a>
</div>


<ul id="idTreeView">
<apex:repeat value="{!Nodes}" var="Pitem">


<li>
<b><apex:outputtext escape="false" style="color: black;" value="{!Pitem.Parent.Name}"></apex:outputtext></b>


<ul>
<apex:repeat value="{!Pitem.Child}" var="Citem">


<li>
<span class="formattextcon"><apex:outputtext escape="false" style="color: red;" value="{!Citem.LastName}"></apex:outputtext></span>
</li>


</apex:repeat>  
</ul>


</li>


</apex:repeat>
</ul>


<!-- End of TreeView -->      
</apex:page>

And here is the output:

download (1)

download (2)