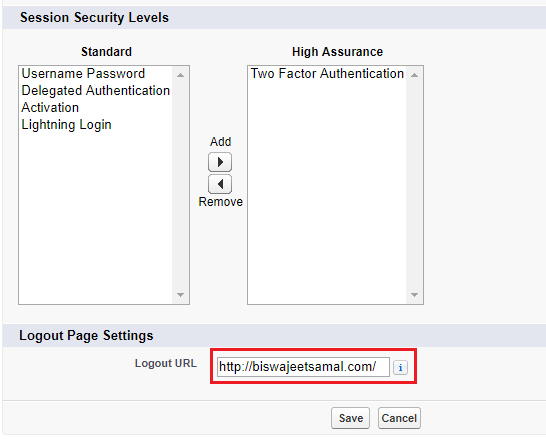
Now you can direct users to a specific logout destination that maintains your own branding experience after they log out of Salesforce.
To enable this follow below steps:
Goto Setup | Administer | Security Controls | Session Settings, navigate to Logout Page Settings section and set the Logout URL of the custom logout page.
leftPad(length): Returns the current String padded with spaces on the left and of the specified length. If length is less than or equal to the current String size, the entire String is returned without space padding.
leftPad(length, padStr): Returns the current String padded with String padStr on the left and of the specified length. padStr to pad with; if null or empty treated as single blank.
rightPad(length): Returns the current String padded with spaces on the right and of the specified length. If length is less than or equal to the current String size, the entire String is returned without space padding.
rightPad(length, padStr): Returns the current String padded with String padStr on the right and of the specified length. padStr to pad with; if null or empty treated as single blank.
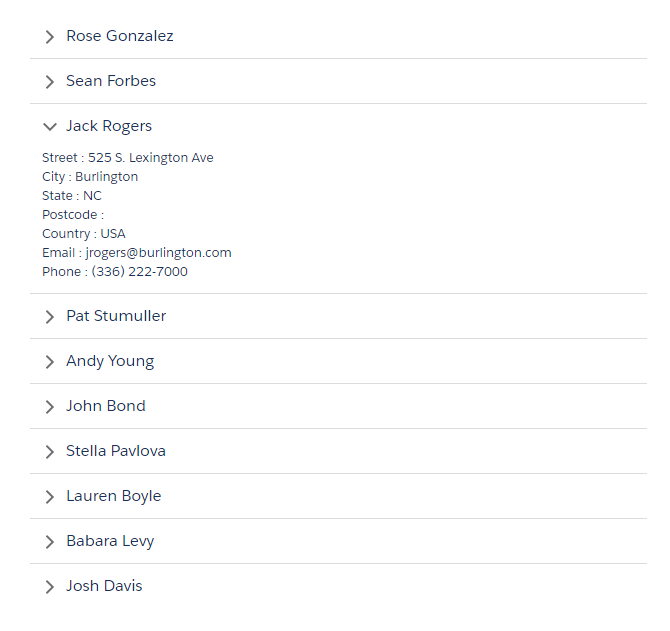
lightning:accordion component groups related content in a single container. Only one accordion section is expanded at a time. When you select a section, it’s expanded or collapsed. Each section can hold one or more Lightning components.
Here is an example of Lightning Accordion. I’m retrieving a list of contacts from Salesforce and populating into the Lightning Accordion.
Apex Controller:
public class AccordionAuraController {
    @AuraEnabled
    public static List<Contact> getContacts(){
        List<Contact> contactList = new List<Contact>();
        contactList = [SELECT Id, Name, Email, Phone, MailingStreet, MailingCity, MailingState, MailingPostalCode, MailingCountry From Contact LIMIT 10];
        return contactList;
    }
}
Note: The first section in the lightning:accordion is expanded by default. To change the default, use the activeSectionName attribute in lightning:accordion component. This attribute is case-sensitive. If two or more sections use the same name and that name is also specified as the activeSectionName, the first section is expanded by default.
In Live Agent, sometimes we need to pass some values from the page, where Start Chat button is located, to pre-chat form.
To achieve this, liveagent.addCustomDetail() function can be used to set the values. On pre-chat form page, liveagent.details.preChatInit() function can be used to access those details.
Here is the sample code to pass values from chat button to pre-chat form. In below example I’m passing “FirstName” and “LastName” values to pre-chat form.
Start Chat Button Code:
<div>
    <img class="chatbutton" id="liveagent_button_online_5737F000000Tdus" style="display: none; border: 0px none; cursor: pointer" onclick="liveagent.startChat('5737F000000Tdus')" src="https://contactcenters-developer-edition.ap5.force.com/chat/resource/1510984682000/ChatOnline" />
    <img class="chatbutton" id="liveagent_button_offline_5737F000000Tdus" style="display: none; border: 0px none; " src="https://contactcenters-developer-edition.ap5.force.com/chat/resource/1510983523000/ChatOffline" />
</div>
<script type="text/javascript">
    if (!window._laq) {
        window._laq = [];
    }
    window._laq.push(function() {
        liveagent.showWhenOnline('5737F000000Tdus', document.getElementById('liveagent_button_online_5737F000000Tdus'));
        liveagent.showWhenOffline('5737F000000Tdus', document.getElementById('liveagent_button_offline_5737F000000Tdus'));
    });
</script>

<script type='text/javascript' src='https://c.la1-c1-ukb.salesforceliveagent.com/content/g/js/41.0/deployment.js'></script>
<script type='text/javascript'>
    liveagent.init('https://d.la1-c1-ukb.salesforceliveagent.com/chat', '5727F000000TijS', '00D7F000003EL75');//Set First Name
	//Set First Name
    liveagent.addCustomDetail('FirstName', 'Biswajeet');
	//Set Last Name
    liveagent.addCustomDetail('LastName', 'Samal');
    liveagent.setName('Biswajeet');
</script>
Pre-Chat Form Page:
    <script type='text/javascript' src='https://d.la1-c1-ukb.salesforceliveagent.com/content/g/js/36.0/prechat.js'></script>
    <script type="text/javascript">
        //Get Custom Details data
        function ChatCallBack(Object) {
            for (var i = 0; i < Object.customDetails.length; i++) {

                if (Object.customDetails[i].label == 'FirstName') {
                    //Get First Name
                    console.log(Object.customDetails[i].value);
                }
                if (Object.customDetails[i].label == 'LastName') {
                    //Get Last Name
                    console.log(Object.customDetails[i].value);
                }
            }
        };
        liveagent.details.preChatInit('https://d.la1-c1-ukb.salesforceliveagent.com/chat', 'ChatCallBack');
    </script>
In Live Agent, sometimes we need to pass some values from the page, where Start Chat button is located, to Pre-chat form.
To achieve this, we use liveagent.addCustomDetail() function to set the values. On Pre-chat form page, we use prechat.js and liveagent.details.preChatInit() function to access those details.
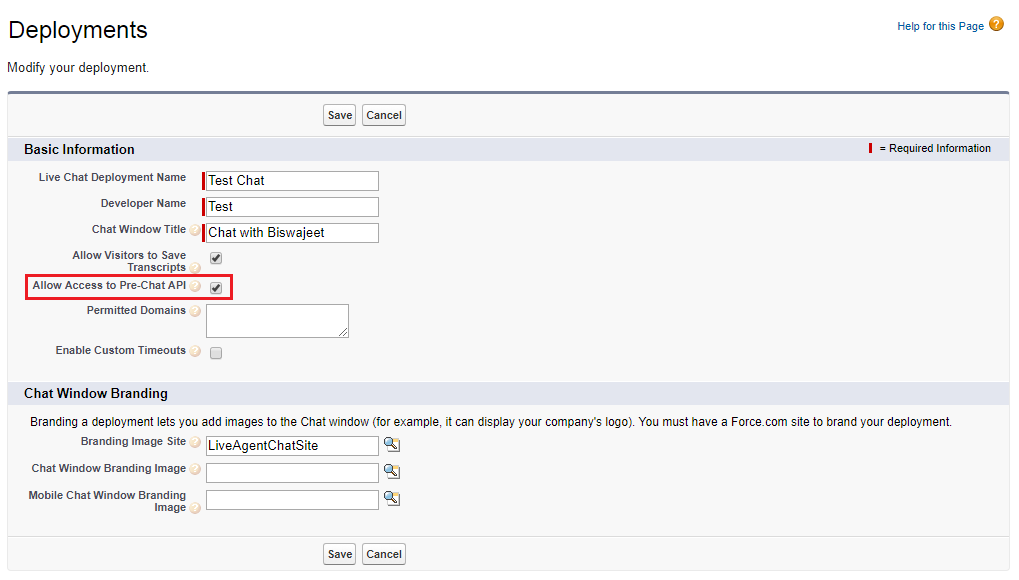
But if the “Allow Access to Pre-Chat API” in deployment is not enable, then we will face “Prechat API is not enabled by the specified deployment” JavaScript error.
Follow below steps to enable it.
Go to Setup || Customize || Live Agent || Deployments || Edit or Create your Deployment || Enable “Allow Access to Pre-Chat API” || Save
This website uses cookies to improve your experience. We'll assume you're ok with this, but you can opt-out if you wish.AcceptReject