We can login from many ways to Salesforce instance using Microsoft Access, GitHub, Janrain, Google, Facebook, Linked, Twitter and also from other Salesforce Org. In this article I’ll describe, how we can login from one Salesforce Org to another Salesforce Org using Authentication provider.
In this article I’m using two Salesforce Org one is “Org A” and another one is “Org B”. Here I’ll login from “Org B” with “Org A” credentials, and “Org B” will authenticate user and will act as source organization for login.
Step 1:
Enable my domain in your “Org B”. This step is important so that it will display all available Authentication provider for that Salesforce instance.
To enable my domain navigate to “Setup | Administration Setup | Domain Management | My Domain.
Enter a name for your domain after https:// and click Check Availability.
If the name is available, click the Terms and Conditions check box, then click Register Domain.
Step 2:
Here we need “Org A” User to be logged in from “Org B”. So, “Org B” should be able to identify that request is coming from “Org A”. Therefore Connected App needs to be created in “Org A”.
Create Connected App in “Org A”, Navigate to “Setup | Build | Create | Apps | Connected Apps” and click on New. Provide All information except “Callback URL”. We will comeback again on this step later to provide Callback URL.
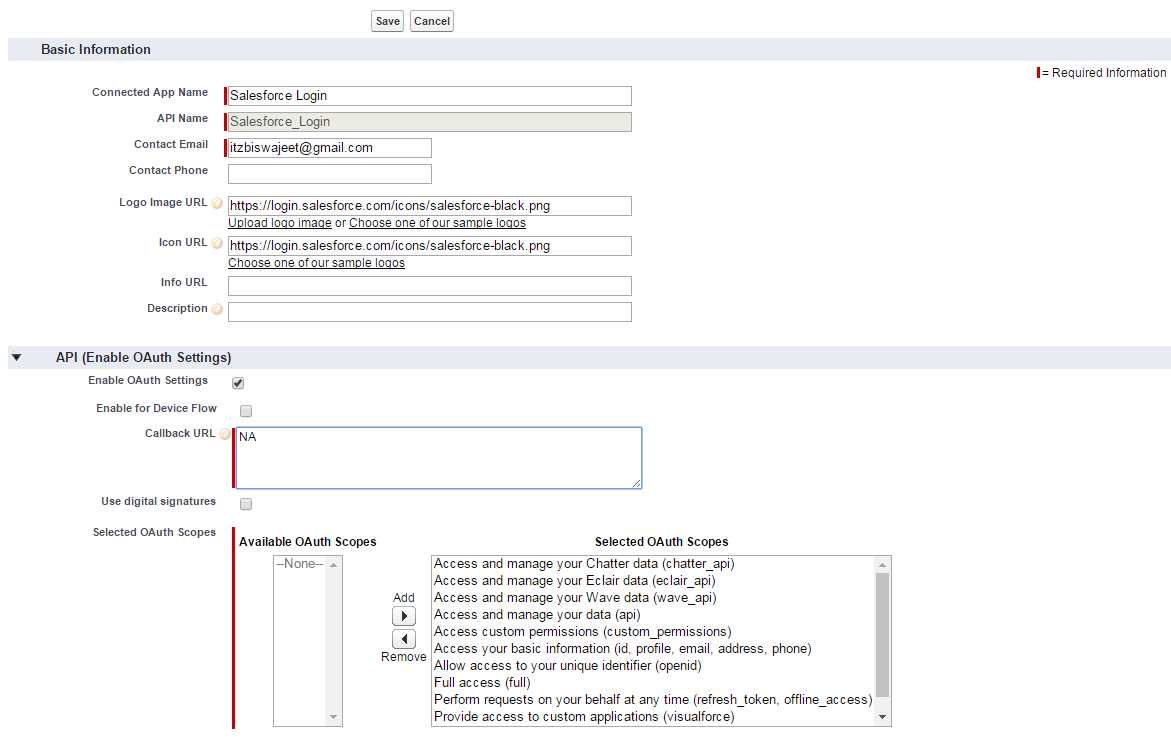
“Callback URL” is the URL where “Authentication Provider instance” should return after providing access. Even if somehow “Consumer Key” and “Consumer Secret” is compromised, it will return to Callback URL which is your application.
Connected App also has “Consumer Key” and “Consumer Secret” which is equivalent to “username” and “password” for that App. Once you save this Connected app, it will provide “Consumer Key” and “Consumer Secret”, we need this information in next step.
Step 3:
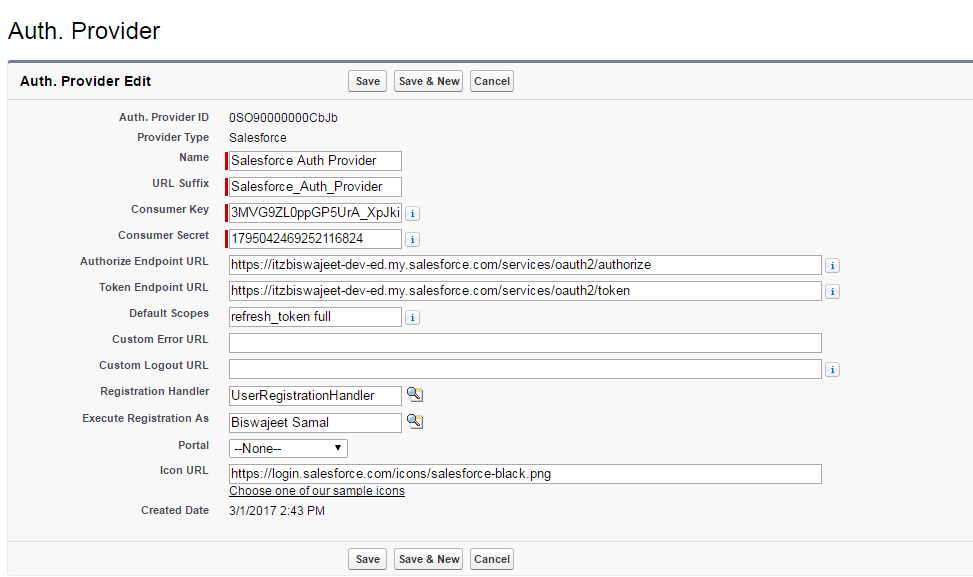
Create Authorization Provider in “Org B”, Navigate to “Setup | Administer | Security Controls | Auth. Providers | Create New”.
Use the following settings:
Provider Type: Salesforce
Name: Salesforce Auth Provider
URL Suffix: Will auto populate as per the Name field
Consumer Key: Provide the “Org A” created connected App consumer key
Consumer Secret: Put the “Org A” created connected App consumer Secret key
Authorize Endpoint URL: https://OrgAinstance/services/oauth2/token
Token Endpoint URL: https://OrgAinstance/services/oauth2/authorize
Default Scopes: The value should be “refresh_token full”. “refresh_token” and “full” should be separated by space.
Registration Handler: Click on “Automatically create a registration handler template”, it will generate one apex class. We can modify that class as per our requirement, here the class name is “UserRegistrationHandler”.
Execute Registration As: Then Select User who should be used to execute this Apex class when user tries to login.
Icon URL: You can choose one sample icons
Here is the sample class “UserRegistrationHandler”.
This class is in “Org B”. When the “Org A” user will login with “Org A” credentials, then this class will execute. And will check, if the user is not exist then it will create a new user, otherwise it will update that user information.
Note: It is a sample class, you can modify it as per your business requirement.
/**
*   @Author         :   Biswajeet Samal
*   @Date           :   03/01/2017
*   @Description    :   This class includes the basics for an User Registration
**/

global class UserRegistrationHandler implements Auth.RegistrationHandler{

    global boolean canCreateUser(Auth.UserData data) {

        if(data != null && data.email != null && data.lastName != null && data.firstName != null){
            return true;
        }
        return false;
    }

    global User createUser(Id portalId, Auth.UserData data){

        //Check that User doesn't already exist
        if(!canCreateUser(data)) {
            if(data.email != null){
                User u = [Select Id, Username From User Where email =: data.email];
                return u;
            }
            else {
                return null;
            }
        }

        //The user is authorized, so create their Salesforce User
        //Here I'm creating 'Chatter Free User' Profile User
        User u = new User();
        Profile p = [SELECT Id FROM profile WHERE name = 'Chatter Free User'];

        //Customize the Username as per your required format.
        //Also check that the Username doesn't already exist.
        //Possibly ensure there are enough org licenses to create a user. Must be 80 characters or less.
        u.username = 'Test' + data.username;
        u.email = data.email;
        u.lastName = data.lastName;
        u.firstName = data.firstName;
        String alias = data.username;

        //Alias must be 8 characters or less
        if(alias.length() > 8) {
            alias = alias.substring(0, 8);
        }
        u.alias = alias;
        u.languagelocalekey = UserInfo.getLocale();
        u.localesidkey = UserInfo.getLocale();
        u.emailEncodingKey = 'UTF-8';
        u.timeZoneSidKey = 'America/Los_Angeles';
        u.profileId = p.Id;
        return u;
    }

    global void updateUser(Id userId, Id portalId, Auth.UserData data){
        User u = new User(id=userId);
        u.email = data.email;
        u.lastName = data.lastName;
        u.firstName = data.firstName;
        update(u);
    }
}
Step 4:
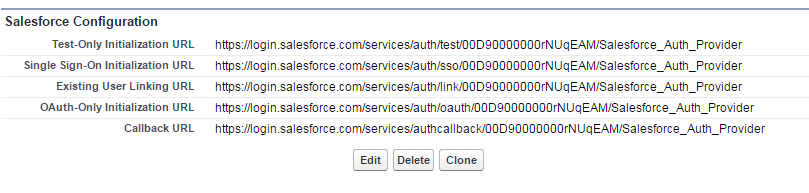
Set Callback URL in Connected App, Once you save “Auth. Provider” in “Org B”, it will provide you list of URL as shown in below image. Copy Callback URL from “Org B” and edit Connected App in “Org A” and set this URL.
Step 5:
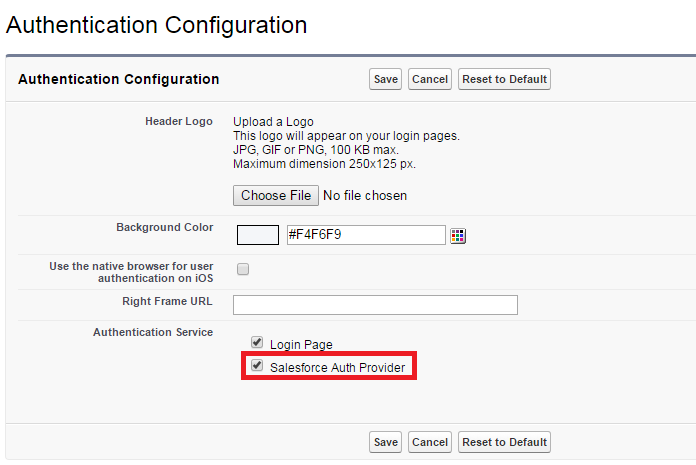
Navigate to “Setup | Administer | Domain Management | My Domain | Authentication Configuration | Edit”.
This page will provide, list of all Authentication providers like LinkedIn, Facebook, Google, In our case Salesforce.
Now logout and navigate to Login page specific to your instance and you should be able to see all Authentication provider buttons for your instance. Pleas note that, Authentication provider button will not appear on “https://login.salesforce.com” page, it has to be Mydomain login URL.
This is sample of Login page, how it will look like.
